All Products are in stock
and shipped from France.
Delivery within 48 hours.
and shipped from France.
Delivery within 48 hours.
Our categories
-
Special effect paints
- Chameleon effect paints
- Paint with an opalescent pearlescent sheen
- Prismatic Paints
- Candy Paints
- The fluorescent paints
- Phosphorescent paints
- Fluorescent paints UV
- Crystal Pearlescent Clearcoat
- Marble and crystal paint
- Paints that react to temperature
- Paints that react to light
- Magnetic paint and rust color
- Chrome effects
-
Our paint ranges for bodywork
-
PAINT KIT FOR CAR BODYWORK
-
CAR COLOUR CODE
- AIXAM car paint
- ALFA ROMEO car paint
- ASTON MARTIN car paint
- AUDI car paint
- BMC car paint
- BMW car paint
- BUGATTI car paint
- CADILLAC car paint
- CHEVROLET car paint
- CHRYSLER car paint
- CITROEN car paint
- DACIA car paint
- DAEWOO car paint
- DAIHATSU car paint
- DODGE car paint
- FERRARI car paint
- FIAT car paint
- FORD car paint
- GENERAL MOTORS car paint
- HONDA car paint
- HYUNDAI car paint
- ISUZU car paint
- IVECO car paint
- JAGUAR car paint
- JEEP car paint
- KIA car paint
- LADA car paint
- LAMBORGHINI car paint
- LANCIA car paint
- LAND ROVER car paint
- LEXUS car paint
- Lotus car paint
- MASERATI car paint
- MAZDA car paint
- MERCEDES car paint
- MG car paint
- MINI car paint
- MITSUBISHI car paint
- NISSAN car paint
- OPEL car paint
- PEUGEOT car paint
- PORSCHE car paint
- RENAULT car paint
- Rolls Royce car paint
- ROVER car paint
- Saab car paint
- SEAT car paint
- SKODA car paint
- SMART car paint
- SSANGYONG car paint
- SUBARU car paint
- SUZUKI car paint
- TOYOTA car paint
- Volkswagen car paint
- VOLVO car paint
- Primers for car paints
- Epoxy-polyester paint for wheel rim
- Spraypaint bodywork
- Metallic effect paints for car bodywork
- Tuning paints with effects
- Pearlescent paints for bodywork
- Solvent-based 1K base coats for cars
- 2K paints for cars
- Vintage cars paints
- Rustproof car frame paints
- Car underbodies and pick-up trucks paints
- Car cylinder block paints
- Dashboard paints
- Car brake paints
- Plastic bumper paints
- Car wing mirror paints
-
CAR COLOUR CODE
-
PAINT KIT FOR MOTORCYCLE BODYWORK
-
Motorcycle and scooter paint code - Can or spray paint
- APRILIA motorcycle paint
- BENELLI motorcycle paint
- BIMOTA motorcycle paint
- BMW motorcycle paint
- Buell motorcycle paint
- CAGIVA motorcycle paint
- DERBI motorcycle paint
- DUCATI motorcycle paint
- GILERA motorcycle paint
- HARLEY-DAVIDSON motorcycle paint
- HONDA motorcycle paint
- HUSQVARNA motorcycle paint
- INDIAN MOTORCYCLE PAINT
- KAWASAKI motorcycle paint
- KTM motorcycle paint
- KYMCO motorcycle paint
- LAMBRETTA motorcycle paint
- MALAGUTI motorcycle paint
- MBK motorcycle paint
- MORINI motorcycle paint
- GUZZI motorcycle paint
- MV AGUSTA motorcycle paint
- PEUGEOT motorcycle and scooter paint
- PIAGGIO motorcycle paint
- SACHS motorcycle paint
- SUZUKI motorcycle paint
- SYM motorcycle paint
- TRIUMPH motorcycle paint
- YAMAHA motorcycle paint
- Motorcycle tuning paints
- Motorcycle paint primers
- Motorcycle spray paints
- Epoxy paints for motorcycle frames
- Epoxy paints for motorcycle rims
- Metallic motorcycle paints
- Pearly motorcycle paints
- Motorcycle clearcoats
- The paints for plastic of cross country motorcycle
- Jet ski hull paints
- Paints for Quad
-
Motorcycle and scooter paint code - Can or spray paint
- Scooter fairing paints
- Helmet paints
- Auxiliary products
- Bicycle paints - Stardust Bike
- RAL Paint - Pantone Code
-
PAINT KIT FOR CAR BODYWORK
- Finish paints and topcoats
-
Artistic and custom specialties
- EPOXY RESINS
- Gilding with a gold leaf
- Pinstriping paint and brushes
- Hydrographic Film
- Covering car and motorcycle
- Pearls and Flakes bodywork
- Painting over the body
- Paint for fishing decoys
- Paints for guitars
- HIKARI : paints for models and miniatures
- Acrylic 3D Printing Paint – Primers, Colors, and Clearcoat
-
Bodywork accessories and consumables
- HVLP Spray Guns for car and motorcycle paints
- Our ranges of airbrushes
- Compressed air connections
- BODYWORK ACCESSORIES
- Abrasives for bodywork
- Buffing and polishing of bodywork
- Protective Equipment for painters
- POSTERS
- Paint air filters
- sample supports for paint tests
- Infrared and ultraviolet drying lamps for paint
- Bodywork adhesives and paint
- Air compressors for painting
- Paints for airbrush
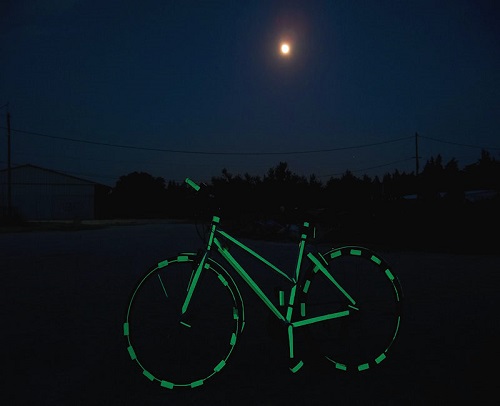 How to make your bike phosphorescent ?
It's an ambitious and slightly crazy project... But if it's taken seriously, the result can be really original and surprising : painting a phosphorescent paint for a bike is done in several mandatory steps. Applying a classic paint or a phosphorescent paint to the frame of a bicycle is almost the same thing, however there are a few rules and tips to follow so that the phosphorescent bicycle is clearly visible at night!
The occasional painter who uses aerosols, or the professional of customization and spray painting, will have to respect 3 steps, therefore 3 different layers, which are necessary and must be applied in a certain order, following preference (There is a 2-step version that we will reveal below...). These are the white undercoat, the paint based on Strontium / Europium deactivated and the varnish.
Why is it better to paint the 3 coats in a row? We'll explain it to you below.
How to apply phosphorescent paint on a bicycle ?
We will skip over the obvious dismantling of the parts, because of course you cannot paint a frame and its handlebars, with its wheels! First of all, it is especially necessary to take the time and the care to prepare the support* meticulously before launching, that is to say to sand with paper 500 with water, or dry, then degrease, dry, dust ... This is the key to success. We can then paint the paint (matt base) with a white background on all the parts.
The support: it is the existing background, therefore logically, the old varnish. A primer should be used if the frame is bare (white metal primer), or a “filler” type primer if the frame is painted and damaged. In this case, we therefore apply a white primer that we will sand after drying, always with 320 or 500 (no finer, otherwise we lose the grip).
On this all-white bike, we can paint the phosphorescent paint. The goal is to apply a maximum of layers, which will guarantee a maximum photo-luminescent effect. To put it simply, phosphorescence levels are expressed in microcandella / m² with a scale from A (low) to G (ultra strong): you can obtain a phosphorescent bike with classification C in 4-5 layers, D in 5-6 layers ...
Once you have painted the phosphorescent on the bike, then you have to varnish exactly within 10 minutes to 20 or 30 minutes, to protect. The varnish does not block the effect. On the contrary, it protects it very durably.
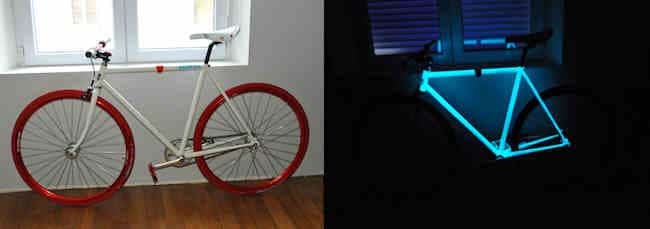 Why is a white background necessary ?
It's simple, try painting phosphorescent on a black bike, and you will find that the intensity of the luminance effect is close to 0, it is invisible. The cause is that the paint is transparent and the black absorbs the light, while the white bounces the light.
Why do we have to chain the layers ?
It is important to paint the coats on top of each other in a restricted time interval to benefit from the cohesion and adhesion between the coats. Indeed, like any painting, after a certain drying time, the surface “closes” and you can no longer cling to it. The result: a probable detachment of the paints more or less quickly.
By the way, it is possible to carry out the painting in only 2 stages instead of 3, by using a phosphorescent varnish, of the "PHU2K" polyurethane type.
What color do phosphorescent paints have ?
They are colorless, but give a slight greenish appearance. That is to say that on the initial white background, as you apply layers of phosphorescent on the bike, the appearance becomes slightly greenish or yellowish.
This inconspicuous color is attributed to the content of Europium, a heavy and non-radioactive metal: the more yellowish the effect, the more powerful the phosphorescence effect will be at night.
- Special Effect Paints
- Chrome Effect
-
Car and motorcycle paint
-
CAR COLOUR CODE
- AIXAM car paint
- ALFA ROMEO car paint
- ASTON MARTIN car paint
- AUDI car paint
- BMC car paint
- BMW car paint
- BUGATTI car paint
- CADILLAC car paint
- CHEVROLET car paint
- CHRYSLER car paint
- CITROEN car paint
- DACIA car paint
- DAEWOO car paint
- DAIHATSU car paint
- DODGE car paint
- FERRARI car paint
- FIAT car paint
- FORD car paint
- GENERAL MOTORS car paint
- HONDA car paint
- HYUNDAI car paint
- ISUZU car paint
- IVECO car paint
- JAGUAR car paint
- JEEP car paint
- KIA car paint
- LADA car paint
- LAMBORGHINI car paint
- LANCIA car paint
- LAND ROVER car paint
- LEXUS car paint
- Lotus car paint
- MASERATI car paint
- MAZDA car paint
- MERCEDES car paint
- MG car paint
- MINI car paint
- MITSUBISHI car paint
- NISSAN car paint
- OPEL car paint
- PEUGEOT car paint
- PORSCHE car paint
- RENAULT car paint
- Rolls Royce car paint
- ROVER car paint
- Saab car paint
- SEAT car paint
- SKODA car paint
- SMART car paint
- SSANGYONG car paint
- SUBARU car paint
- SUZUKI car paint
- TOYOTA car paint
- Volkswagen car paint
- VOLVO car paint
.
.
.
-
MOTO COLOUR CODE
- APRILIA motorcycle paint
- BENELLI motorcycle paint
- BIMOTA motorcycle paint
- BMW motorcycle paint
- Buell motorcycle paint
- CAGIVA motorcycle paint
- DERBI motorcycle paint
- DUCATI motorcycle paint
- GILERA motorcycle paint
- HARLEY-DAVIDSON motorcycle paint
- HONDA motorcycle paint
- HUSQVARNA motorcycle paint
- INDIAN MOTORCYCLE PAINT
- KAWASAKI motorcycle paint
- KTM motorcycle paint
- KYMCO motorcycle paint
- LAMBRETTA motorcycle paint
- MALAGUTI motorcycle paint
- MBK motorcycle paint
- MORINI motorcycle paint
- GUZZI motorcycle paint
- MV AGUSTA motorcycle paint
- PEUGEOT motorcycle and scooter paint
- PIAGGIO motorcycle paint
- SACHS motorcycle paint
- SUZUKI motorcycle paint
- SYM motorcycle paint
- TRIUMPH motorcycle paint
- YAMAHA motorcycle paint

.
.

-
CAR COLOUR CODE
- Finish Paints and Topcoats
-
Specialties

-
Accessories and consumables
.
.
- AIRBRUSH PAINT
- COLORCHART


