All Products are in stock
and shipped from France.
Delivery within 48 hours.
and shipped from France.
Delivery within 48 hours.
Our categories
-
Special effect paints
- Chameleon effect paints
- Paint with an opalescent pearlescent sheen
- Prismatic Paints
- Candy Paints
- The fluorescent paints
- Phosphorescent paints
- Fluorescent paints UV
- Crystal Pearlescent Clearcoat
- Marble and crystal paint
- Paints that react to temperature
- Paints that react to light
- Magnetic paint and rust color
- Chrome effects
-
Our paint ranges for bodywork
-
PAINT KIT FOR CAR BODYWORK
-
CAR COLOUR CODE
- AIXAM car paint
- ALFA ROMEO car paint
- ASTON MARTIN car paint
- AUDI car paint
- BMC car paint
- BMW car paint
- BUGATTI car paint
- CADILLAC car paint
- CHEVROLET car paint
- CHRYSLER car paint
- CITROEN car paint
- DACIA car paint
- DAEWOO car paint
- DAIHATSU car paint
- DODGE car paint
- FERRARI car paint
- FIAT car paint
- FORD car paint
- GENERAL MOTORS car paint
- HONDA car paint
- HYUNDAI car paint
- ISUZU car paint
- IVECO car paint
- JAGUAR car paint
- JEEP car paint
- KIA car paint
- LADA car paint
- LAMBORGHINI car paint
- LANCIA car paint
- LAND ROVER car paint
- LEXUS car paint
- Lotus car paint
- MASERATI car paint
- MAZDA car paint
- MERCEDES car paint
- MG car paint
- MINI car paint
- MITSUBISHI car paint
- NISSAN car paint
- OPEL car paint
- PEUGEOT car paint
- PORSCHE car paint
- RENAULT car paint
- Rolls Royce car paint
- ROVER car paint
- Saab car paint
- SEAT car paint
- SKODA car paint
- SMART car paint
- SSANGYONG car paint
- SUBARU car paint
- SUZUKI car paint
- TOYOTA car paint
- Volkswagen car paint
- VOLVO car paint
- Primers for car paints
- Epoxy-polyester paint for wheel rim
- Spraypaint bodywork
- Metallic effect paints for car bodywork
- Tuning paints with effects
- Pearlescent paints for bodywork
- Solvent-based 1K base coats for cars
- 2K paints for cars
- Vintage cars paints
- Rustproof car frame paints
- Car underbodies and pick-up trucks paints
- Car cylinder block paints
- Dashboard paints
- Car brake paints
- Plastic bumper paints
- Car wing mirror paints
-
CAR COLOUR CODE
-
PAINT KIT FOR MOTORCYCLE BODYWORK
-
Motorcycle and scooter paint code - Can or spray paint
- APRILIA motorcycle paint
- BENELLI motorcycle paint
- BIMOTA motorcycle paint
- BMW motorcycle paint
- Buell motorcycle paint
- CAGIVA motorcycle paint
- DERBI motorcycle paint
- DUCATI motorcycle paint
- GILERA motorcycle paint
- HARLEY-DAVIDSON motorcycle paint
- HONDA motorcycle paint
- HUSQVARNA motorcycle paint
- INDIAN MOTORCYCLE PAINT
- KAWASAKI motorcycle paint
- KTM motorcycle paint
- KYMCO motorcycle paint
- LAMBRETTA motorcycle paint
- MALAGUTI motorcycle paint
- MBK motorcycle paint
- MORINI motorcycle paint
- GUZZI motorcycle paint
- MV AGUSTA motorcycle paint
- PEUGEOT motorcycle and scooter paint
- PIAGGIO motorcycle paint
- SACHS motorcycle paint
- SUZUKI motorcycle paint
- SYM motorcycle paint
- TRIUMPH motorcycle paint
- YAMAHA motorcycle paint
- Motorcycle tuning paints
- Motorcycle paint primers
- Motorcycle spray paints
- Epoxy paints for motorcycle frames
- Epoxy paints for motorcycle rims
- Metallic motorcycle paints
- Pearly motorcycle paints
- Motorcycle clearcoats
- The paints for plastic of cross country motorcycle
- Jet ski hull paints
- Paints for Quad
-
Motorcycle and scooter paint code - Can or spray paint
- Scooter fairing paints
- Helmet paints
- Auxiliary products
- Bicycle paints - Stardust Bike
- RAL Paint - Pantone Code
-
PAINT KIT FOR CAR BODYWORK
- Finish paints and topcoats
-
Artistic and custom specialties
- EPOXY RESINS
- Gilding with a gold leaf
- Pinstriping paint and brushes
- Hydrographic Film
- Covering car and motorcycle
- Pearls and Flakes bodywork
- Painting over the body
- Paint for fishing decoys
- Paints for guitars
- HIKARI : paints for models and miniatures
- Acrylic 3D Printing Paint – Primers, Colors, and Clearcoat
-
Bodywork accessories and consumables
- HVLP Spray Guns for car and motorcycle paints
- Our ranges of airbrushes
- Compressed air connections
- BODYWORK ACCESSORIES
- Abrasives for bodywork
- Buffing and polishing of bodywork
- Protective Equipment for painters
- POSTERS
- Paint air filters
- sample supports for paint tests
- Infrared and ultraviolet drying lamps for paint
- Bodywork adhesives and paint
- Air compressors for painting
- Paints for airbrush
 How to make your soil phosphorescent ?
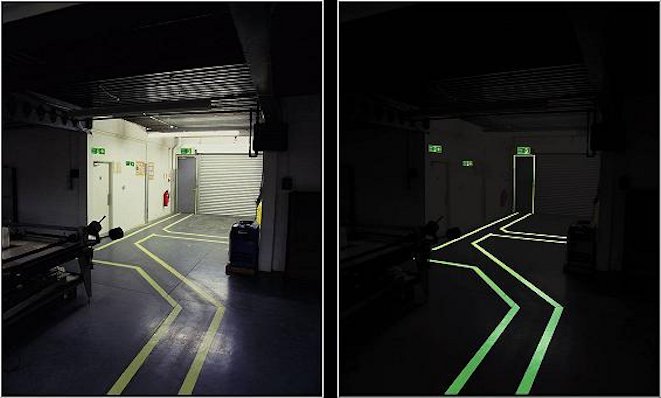
One way to guide people through a darkened space and in an emergency situation is to apply a phosphorescent paint for safety on a floor. There are other solutions to make a floor photo-luminescent (see below) but here we will look at all the techniques for painting a floor in phosphorescent (it's a synonym). Commonly, this consists of making phosphorescent strips on the concrete floor, which will allow marking and guiding towards the exits, and the system is always done in two stages: white primer + phosphorescent floor lacquer.
We use marking on the flat, in general when we cannot signal vertically (on walls, doors, posts, etc.). Horizontal marking is always a second-choice solution, because it involves some constraints related to the passage of vehicles, machinery, as well as trampling. We therefore need solutions that are very "adherent" to avoid detachment, and very resistant to maintain their effectiveness over the long term.
Achieving an effective and durable coating requires following a few simple rules :
How to apply phosphorescent paint on a floor ?
First of all, properly prepare the background to be painted, by removing all contaminants that will hinder good adhesion, by washing, drying, dusting. Determine the type of support, the material:
there are a variety of them (wood, paint, concrete, resin, vinyl, etc.), and it is important to choose the appropriate primer (imperatively white). In usual situations, there is generally a concrete bottom (sometimes smooth and impermeable, see below for this particular case). Our acrylic and epoxy undercoats allow good impregnation and grip on the concrete.
The concrete primer and the phosphorescent finish paint for floors are two-component products, slow drying, which gives a high hardness after hardening. The delimitation of the paintings on the floor is done with adhesives. It is important to respect 60 minutes between each coat of white or phosphorescent.
On the concrete primer, we will therefore apply 3 coats of phosphorescent lacquer, with a brush, a roller, or a spray gun, at 1 hour intervals. Painting a 4th or 5th coat will achieve higher levels of phosphorescence that meet or even exceed safety standards in this area. The hardening through and therefore the commissioning is at least 24/48h after application.
 Beware of the case of smooth concrete
They are called helicopter concrete, in reference to the smoothing technique with propeller machines: this technique smoothes and hardens concrete floors, so much so that it makes them waterproof. How to determine it ?
Simply by doing the drop test, by depositing a drop of water on the concrete to see if the floor "drinks" or not: impermeable floors must undergo a preliminary treatment of preparation with acidic water. Otherwise, the paint cannot adhere to it.
Miscellaneous remarks
What happens if you apply it on a non-white background ?
It is possible to paint the concrete floor directly with phosphorescent, because the phosphorescent epoxy paint sticks to it without any problem. The gray background, not the white one, will make the level of photoluminescence much lower. As for the daytime aspect, it will always be gray and almost invisible.
A tip to avoid drips under the adhesives :
When you remove the masking used to paint the strips on the floor, you often find leaks of white primer paint, resulting in an uneven white line . The solution to plug these leaks is to apply a good coat of transparent first and then apply the white primer.
- Special Effect Paints
- Chrome Effect
-
Car and motorcycle paint
-
CAR COLOUR CODE
- AIXAM car paint
- ALFA ROMEO car paint
- ASTON MARTIN car paint
- AUDI car paint
- BMC car paint
- BMW car paint
- BUGATTI car paint
- CADILLAC car paint
- CHEVROLET car paint
- CHRYSLER car paint
- CITROEN car paint
- DACIA car paint
- DAEWOO car paint
- DAIHATSU car paint
- DODGE car paint
- FERRARI car paint
- FIAT car paint
- FORD car paint
- GENERAL MOTORS car paint
- HONDA car paint
- HYUNDAI car paint
- ISUZU car paint
- IVECO car paint
- JAGUAR car paint
- JEEP car paint
- KIA car paint
- LADA car paint
- LAMBORGHINI car paint
- LANCIA car paint
- LAND ROVER car paint
- LEXUS car paint
- Lotus car paint
- MASERATI car paint
- MAZDA car paint
- MERCEDES car paint
- MG car paint
- MINI car paint
- MITSUBISHI car paint
- NISSAN car paint
- OPEL car paint
- PEUGEOT car paint
- PORSCHE car paint
- RENAULT car paint
- Rolls Royce car paint
- ROVER car paint
- Saab car paint
- SEAT car paint
- SKODA car paint
- SMART car paint
- SSANGYONG car paint
- SUBARU car paint
- SUZUKI car paint
- TOYOTA car paint
- Volkswagen car paint
- VOLVO car paint
.
.
.
-
MOTO COLOUR CODE
- APRILIA motorcycle paint
- BENELLI motorcycle paint
- BIMOTA motorcycle paint
- BMW motorcycle paint
- Buell motorcycle paint
- CAGIVA motorcycle paint
- DERBI motorcycle paint
- DUCATI motorcycle paint
- GILERA motorcycle paint
- HARLEY-DAVIDSON motorcycle paint
- HONDA motorcycle paint
- HUSQVARNA motorcycle paint
- INDIAN MOTORCYCLE PAINT
- KAWASAKI motorcycle paint
- KTM motorcycle paint
- KYMCO motorcycle paint
- LAMBRETTA motorcycle paint
- MALAGUTI motorcycle paint
- MBK motorcycle paint
- MORINI motorcycle paint
- GUZZI motorcycle paint
- MV AGUSTA motorcycle paint
- PEUGEOT motorcycle and scooter paint
- PIAGGIO motorcycle paint
- SACHS motorcycle paint
- SUZUKI motorcycle paint
- SYM motorcycle paint
- TRIUMPH motorcycle paint
- YAMAHA motorcycle paint

.
.

-
CAR COLOUR CODE
- Finish Paints and Topcoats
-
Specialties

-
Accessories and consumables
.
.
- AIRBRUSH PAINT
- COLORCHART
